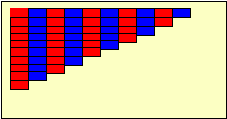
2 sets pf smaller version of number rods in a tray
- Ten rods identical with the Red Rods in length, but divided into red and blue sections. The shortest rod is red. The second is twice the size of the first; one half is painted red and the other half is blue. The third rd is three times the size of the first and is divided into three sections; the first painted red, the second is blue, and the third red. All the other rods are divided in a similar fashion, alternating red and blue, the first section always being red. The number of sections represent the numbers of the rod.
- A floor mat
- Carry and assemble the rod as you would with the Red Rods.
- Do the Three Period Lesson to teach the names, be sure to count the red rods each time.
- Continue through the activities as the child is ready. You must be sure the child understands the quantities before moving on from the naming.
- Some children will be able to do this work in one sitting.
- Be sure to review previous names before moving on to new ones.
- Continue through the series on consecutive days.
- Invite the child to come and work with you. Bring the child over to the Red Rods and discuss with the child how he knows how to use them.
- Tell the child that we have other set of rods that are almost like the Red Rods.
- Show the child the Number Rods and tell the child that they are almost like the Red Rods except for they are red and blue.
- Have the child bring over two mats. Unroll one horizontally and the other vertically. (See diagram)
![]()
![]()
- Have the child bring over each number rod and place them randomly onto the vertical mat.
- Sit in front of the horizontal mat.
- Ask the child to build the rods as he would with the Red Rods on the horizontal mat.

- Point out that we will always start with the red section to the left.
- Isolate the first three rods.
- Point to rod 1. Say, “This is one.” Count.
- Point to the blue on rod 2. Say, “This is two.” Then count.
- Point to the red on rid 3. Say “This is three.” Then count.
- Repeat this a few times. (This is the 1st Period of the Three Period Lesson.)
- Move the rods so they are on the same horizontal line. Do the 2nd Period of the Three Period Lesson.
- Do the 3rd Period of the Three Period Lesson.
- Ask the child to replace the three rods back with the others.
- Take out rods 4, 5, and 6.
- Count each section of rod 4
- Repeat as you did with the first three rods.
- Repeat for rod 7, 8, and 9.
- Then repeat with rods 8, 9, and 10.
- Depending on the child, this may be taught over a few days.
Stage B: Identification by Name
- The Number Rods are in random order on the mat.
- The directress sits between the two mats and has the child sit in front of the vertical mat.
- The directress asks for a specific number rod, the child chooses it, counts it, and places it on the empty mat.
Stage C: Random Identification by Quantity
- The rods are lain out randomly on a mat.
- The directress randomly takes a Number Rod, places it in front of the child and asks, “What is this?”
- The child counts it, and gives you what Number Rod it is.
- Then have the child place it on the empty mat.
- Repeat for all of the rods.
Stage D: Identify Rod Randomly
- The rods are lain out randomly on a mat.
- The child chooses a rod, isolates it on the empty mat and tell the directress what number it is.
- Then the child counts to verify.
- Repeat for all of the rods.
Stage E: Identify Rod in Order
- The rods are in the stair formation.
- Point to one rod in the stair formation and have the child say the number of the rod.
- Then have the child count it to verify.
- Repeat for each rod.
- To experience the qualities of each number and to learn their respective names.
- To show that each number is represented by a single object, as a whole, separate from others.
- To help memorize the sequence of numbers from 1 to 10.
The number of partitions on each rod acts as a guide.
4 years onwards (after the child is competent with the red rods)


